Paneer, popularly known as "curd" among most of us old Hare Krishnas, is the best meat substitute there is, especially when it's fried in ghee (clarified butter). Paneer is homemade cheese, often called "farmer's cheese." It is very easy to make. All you need is two ingredients, a large pot, and a couple of other implements. The first time I saw paneer being made I was flabbergasted. My eyes must have been as big as saucers. It was an exciting never-before-seen (for me, anyway) phenomenon, to watch milk being cut with a knife to make little rectangular chunks! And when those little chunks were fried in clarified butter and then added to a simmering vegetable sauce or mixed-vegetable soup? Ooh-la-LAAAA!!! One cannot satisfactorily describe the amazing flavor and texture experience!
What you will need:
One gallon of fresh, raw cow's milk (if you don't have access to raw milk, you can use store-bought whole milk)
1/2 cup lemon juice or 1 quart buttermilk
Large pot with a fitted lid
Flat-edged pancake-turner (metal spatula)
5-gallon bucket
45" X 45" square piece of thin, 100% cotton cloth like muslin
Spoonula or other type of rubber spatula
Pour one gallon of milk into a large pot and turn the heat on high. I use a 4-gallon-capacity stainless steel pot with a fitted lid and an aluminum-clad bottom.
Scraping the bottom of the pot occasionally with a flat-edged metal spatula, bring the milk to a boil. When the boiling milk starts to rise up in the pot, pour in the lemon juice or buttermilk. The milk will settle back down. Keep the high heat on. At this point, some people stir. I don't, because I like my curds to be big and fluffy. Return to a boil and when the milk separates into curds and whey...
...turn off the flame and cover the pot. Let it rest for 10 minutes while you set up your draining arrangement.
There are various types of draining arrangements used by different cooks in different kitchens. For example, some folks drape several layers of cheesecloth over a large sieve, and set that up on top of a pot or bucket, so as to catch the whey. Some people just use a fine-mesh strainer. Some use cotton cloth only, letting the cloth itself act as the strainer. This is the method I prefer.
After the curds and whey are all poured into the cheesecloth and the whey has dripped through into the bottom of the pot/bucket, you have a solid mass of curd with raggedy edges.

Now, using the spoonula, gather the ragged edges of the curd into the center of the mass until the edges are molded into a more tidy-looking border, like this.

At this point, you can leave the curd to drain even longer and use it for a variety of preparations. For instance, you can break it up and just leave it in chunks to add to vegetable soup or spaghetti sauce. If you want to deep-fry it in ghee, you should press it just a little.
To press the curd, set a large plate with a smooth, flat bottom upside-down in the sink.
Untie the knot of the cheesecloth. As shown below left, gather up the four corners of the cheesecloth and raise them up high so that you are now holding the curd in the upside-down cloth tent.
Lower the cheesecloth containing the curd onto the upside-down plate in the sink. As shown above right, holding onto the cloth above the curd, twist it a few times so that it becomes tightened all the way down to the mass of curd. Some whey might squeeze out. Fill the empty milk pot with cold water. Place the heavy pot full of water on top of the mass of curd. Level it, and leave it there for about one minute if you used raw milk, and for about three minutes if you used store-bought homogenized whole milk.

Remove the pot. Unwrap the curd and push on it gently with your finger. If it is firm enough that your finger does not leave a depression in the surface of the curd, you have pressed it enough. Test the firmness of your paneer like this: open your left hand and spread your fingers apart until your palm is taut. Using your right thumb, press down in the center of your palm. If your paneer feels like that, like your left, open palm feels when you press down on it with your right thumb, it has the right consistency. It should look like this after you unwrap it.

Now you are ready to use it however you wish. There are many things you can do with paneer:
1. You can cut it into square chunks and deep-fry it in ghee, then add it to vegetable stews
2. You can break it into uneven chunks and deep-fry it in ghee, then simmer in chili, spaghetti or add to Spanish rice
3. You can knead it on a bread-board until it's smooth, add salt and use it as cream cheese
4. You can slice it into thin strips, deep-fry it, drain it and salt it as "cheese jerky"
5. You can break it up into bite-size pieces, melt butter in a pan, add spices, toss in the curd and saute for a few minutes to make taco filling
6. You can knead it until smooth, add sugar and cardamom and bake until set, then cool and cut into bars
7. You can knead it until smooth, roll into balls, and boil in sugar-water
The possibilities are pretty much endless.
What you will need:
One gallon of fresh, raw cow's milk (if you don't have access to raw milk, you can use store-bought whole milk)
1/2 cup lemon juice or 1 quart buttermilk
Large pot with a fitted lid
Flat-edged pancake-turner (metal spatula)
5-gallon bucket
45" X 45" square piece of thin, 100% cotton cloth like muslin
Spoonula or other type of rubber spatula
Pour one gallon of milk into a large pot and turn the heat on high. I use a 4-gallon-capacity stainless steel pot with a fitted lid and an aluminum-clad bottom.
 | ||
| 4 Gallon Pot with Fitted Lid |
Note: The reason I use such a large pot is because we have one, and because it gives the milk plenty of room to rise in the pot when it starts to boil. You can use a smaller pot than this, especially if you're curdling a smaller amount of milk.* As long as there's at least a few inches of room between the surface of the milk and the top of the pot (maybe four to six inches) you should be fine. Just keep a close eye on it so that when the milk starts to boil and rise up in the pot, you can turn down the heat so the milk doesn't boil over.
*If you are curdling a smaller quantity of milk than one gallon, just change the amount of the curdling agent. E.g., if curdling a quart, you should use 2 T lemon juice or 1 c of buttermilk.
Scraping the bottom of the pot occasionally with a flat-edged metal spatula, bring the milk to a boil. When the boiling milk starts to rise up in the pot, pour in the lemon juice or buttermilk. The milk will settle back down. Keep the high heat on. At this point, some people stir. I don't, because I like my curds to be big and fluffy. Return to a boil and when the milk separates into curds and whey...
 |
| Remember Little Miss Muffet? |
...turn off the flame and cover the pot. Let it rest for 10 minutes while you set up your draining arrangement.
There are various types of draining arrangements used by different cooks in different kitchens. For example, some folks drape several layers of cheesecloth over a large sieve, and set that up on top of a pot or bucket, so as to catch the whey. Some people just use a fine-mesh strainer. Some use cotton cloth only, letting the cloth itself act as the strainer. This is the method I prefer.
Note: You can use whatever system you want to drain the whey out of the curd. The principle is to separate the curds from the whey and save the whey. You need to drain enough whey out of the curd so that what you end up with is a firm mass of cheese that holds together and can be cut with a knife. I use a thin cotton cloth (you can use several layers of cheesecloth, but I prefer a single square of thin cotton muslin, about 45" X 45". The tight weave prevents loss of cheese through the spaces between the threads, and there are fewer pieces of cloth to clean afterward). If you want to use the type of draining system I use, here is how to do it:
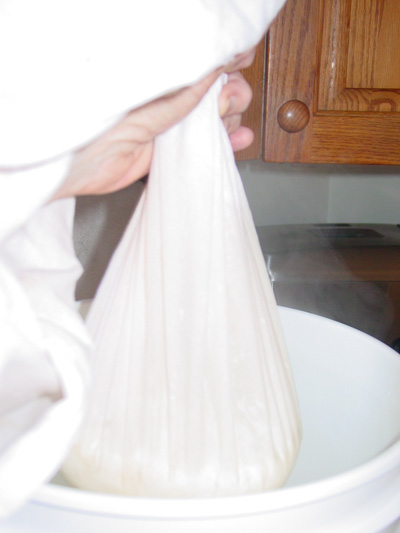
Grab two adjacent corners of the 45" X 45" square of muslin and pull that edge of the cloth taut. With your arms outstretched, holding the two corners apart from each other, center and drape the cloth over the pot or bucket, holding the two corners beyond the pot or bucket and away from you. Lowering the far edge of the cloth about 4 to 5 inches below the top rim of the container, pull those two corners of cloth around both sides of the container until they meet together in front, on your side of the pot or bucket. Now, using those two corners as ends, tie them together, pulling the cloth snugly around the container as you tie the two corners together. Make a simple knot. The cloth is now virtually a cover, or screen, for the pot/bucket. Now, gently but firmly press the cloth which is stretched over the mouth of the container, working and stretching it down until you have made it dip down into the pot/bucket a depth of three or four inches. The depression allows the curd a space to land and rest, and encourages the whey to drip through the cheesecloth. What you've essentially created is a homemade sieve.
Grab two adjacent corners of the 45" X 45" square of muslin and pull that edge of the cloth taut. With your arms outstretched, holding the two corners apart from each other, center and drape the cloth over the pot or bucket, holding the two corners beyond the pot or bucket and away from you. Lowering the far edge of the cloth about 4 to 5 inches below the top rim of the container, pull those two corners of cloth around both sides of the container until they meet together in front, on your side of the pot or bucket. Now, using those two corners as ends, tie them together, pulling the cloth snugly around the container as you tie the two corners together. Make a simple knot. The cloth is now virtually a cover, or screen, for the pot/bucket. Now, gently but firmly press the cloth which is stretched over the mouth of the container, working and stretching it down until you have made it dip down into the pot/bucket a depth of three or four inches. The depression allows the curd a space to land and rest, and encourages the whey to drip through the cheesecloth. What you've essentially created is a homemade sieve.
 |
| cotton cloth stretched over bucket then pressed down to create a homemade sieve
Uncover the pot and slowly, carefully pour the entire contents of the pot through the cheesecloth. The curd will stay in the cheesecloth, and the whey will drain through into the bucket. You will need to use a spoonula or other type of rubber spatula to scrape out all the curd from the bottom and sides of the pot.
|

Now, using the spoonula, gather the ragged edges of the curd into the center of the mass until the edges are molded into a more tidy-looking border, like this.

At this point, you can leave the curd to drain even longer and use it for a variety of preparations. For instance, you can break it up and just leave it in chunks to add to vegetable soup or spaghetti sauce. If you want to deep-fry it in ghee, you should press it just a little.
To press the curd, set a large plate with a smooth, flat bottom upside-down in the sink.
 | |||||
| Smooth-Bottomed Plate for Pressing Curd |
Untie the knot of the cheesecloth. As shown below left, gather up the four corners of the cheesecloth and raise them up high so that you are now holding the curd in the upside-down cloth tent.
 |
| 1. Gather up the corners and capture the cheese inside. |
 |
| 2. Twist the cheesecloth to tighten |
Lower the cheesecloth containing the curd onto the upside-down plate in the sink. As shown above right, holding onto the cloth above the curd, twist it a few times so that it becomes tightened all the way down to the mass of curd. Some whey might squeeze out. Fill the empty milk pot with cold water. Place the heavy pot full of water on top of the mass of curd. Level it, and leave it there for about one minute if you used raw milk, and for about three minutes if you used store-bought homogenized whole milk.

Remove the pot. Unwrap the curd and push on it gently with your finger. If it is firm enough that your finger does not leave a depression in the surface of the curd, you have pressed it enough. Test the firmness of your paneer like this: open your left hand and spread your fingers apart until your palm is taut. Using your right thumb, press down in the center of your palm. If your paneer feels like that, like your left, open palm feels when you press down on it with your right thumb, it has the right consistency. It should look like this after you unwrap it.

Now you are ready to use it however you wish. There are many things you can do with paneer:
1. You can cut it into square chunks and deep-fry it in ghee, then add it to vegetable stews
 |
| Cut Paneer into Square Chunks |
 |
| Deep-fry in Ghee |
2. You can break it into uneven chunks and deep-fry it in ghee, then simmer in chili, spaghetti or add to Spanish rice
 |
| Uneven Chunks |
 |
| Chili with Curd Chunks |
3. You can knead it on a bread-board until it's smooth, add salt and use it as cream cheese
4. You can slice it into thin strips, deep-fry it, drain it and salt it as "cheese jerky"
5. You can break it up into bite-size pieces, melt butter in a pan, add spices, toss in the curd and saute for a few minutes to make taco filling
6. You can knead it until smooth, add sugar and cardamom and bake until set, then cool and cut into bars
7. You can knead it until smooth, roll into balls, and boil in sugar-water
The possibilities are pretty much endless.
No comments:
Post a Comment